LEMP is an abbreviation commonly used to refer to the use of Linux, Nginx, MySQL and PHP scripting software to create a Web server environment, LEMP is more about static Web pages.
Here is some information to help you better understand. LEMP is a combination of Linux + Nginx + MySQL + PHP.
- Linux: Linux is an operating system. In principle, an operating system is also software; But this is a special software used to manage and coordinate the resources (resources) of the system (including hardware and other software). Linux is also known as Open Source Unix (OSU). Here we will use a version of Linux called Ubuntu 16
- Nginx is an open-source (open-source), high-performance Http server and also a reverse proxy, Nginx is known for its high performance, stability, features, simple configuration, and consumption. low resources. It is broadcast completely free of charge.
- MySQL is the fastest database management system in the world, it becomes the most popular open-source database in the world because of its high performance, high reliability, and ease of use. It is great for web-based applications. A lot of support tools have been developed for MySQL with PHP, such as phpMyAdmin is a very good web administration tool for MySQL, and helps you can do whatever you want with MySQL. Here we will use MariaDB One of the most popular database servers. Made by the original developers of MySQL. MariaDB is also open source.
- PHP is developed as a server-side scripting language. In this article we will use PHP-FPM, PHP-FPM (FastCGI Process Manager) is an alternative to PHP with a Useful extra for websites of any size, particularly busy sites.
Now we will show you how to install LEMP on Ubuntu 16.04
Step 1: Install Nginx
Update the Ubuntu software package to the latest version with:
# apt-get update -y
To install Nginx, type the following command:
# apt-get install nginx -y
In Ubuntu 16, Nginx is configured to start running right after installation.
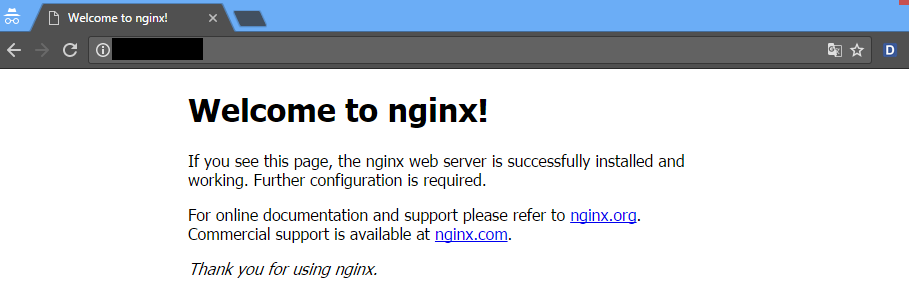
We access the Http: // <ip-vps> address via a web browser if it looks like the following is successful
Step 2. Install PHP-FPM
The default PHP of ubuntu 16 will be php7. You type the following command to install
# apt-get install php-fpm php-mysql -y
Step 3: Configure PHP-FPM
Open the file /etc/php/7.0/fpm/php.ini
# nano /etc/php/7.0/fpm/php.ini
Find the line ‘ cgi.fix_pathinfo = 1 ‘, uncomment it and change the value 1 to 0
cgi.fix_pathinfo = 0
Now, we just need to restart PHP, by typing:
# systemctl restart php7.0-fpm
Step 4: Configure Nginx to use the PHP processor
Before configuring, we should move the configuration file to a backup file for nginx, type the following command:
# mv / etc / nginx / sites-available / default /etc/nginx/sites-available/default.bk
Next, you create an Nginx configuration file
# nano / etc / nginx / sites-available / default
With the content as below
server {
        listen 80 default_server;
        listen [::]: 80 default_server;

        root / var / www / html;
        index index.php index.html index.htm index.nginx-debian.html;
        server_name localhost;

        location / {
                    try_files $ uri $ uri / = 404;
                   }
        location ~ \ .php $ {
                           include snippets / fastcgi-php.conf;
                           fastcgi_pass unix: /run/php/php7.0-fpm.sock;
                          }
        location ~ /\.ht {
                          deny all;
                         }
        }
After creating the file, you save and exit the file
You type the following command to check if the Nginx configuration is ok
# nginx -t

Restart Nginx
# systemctl reload nginx
To check if Nginx and PHP have worked together, we will create a test file
# nano /var/www/html/info.php
Has the following content
<? php
phpinfo ();
?>
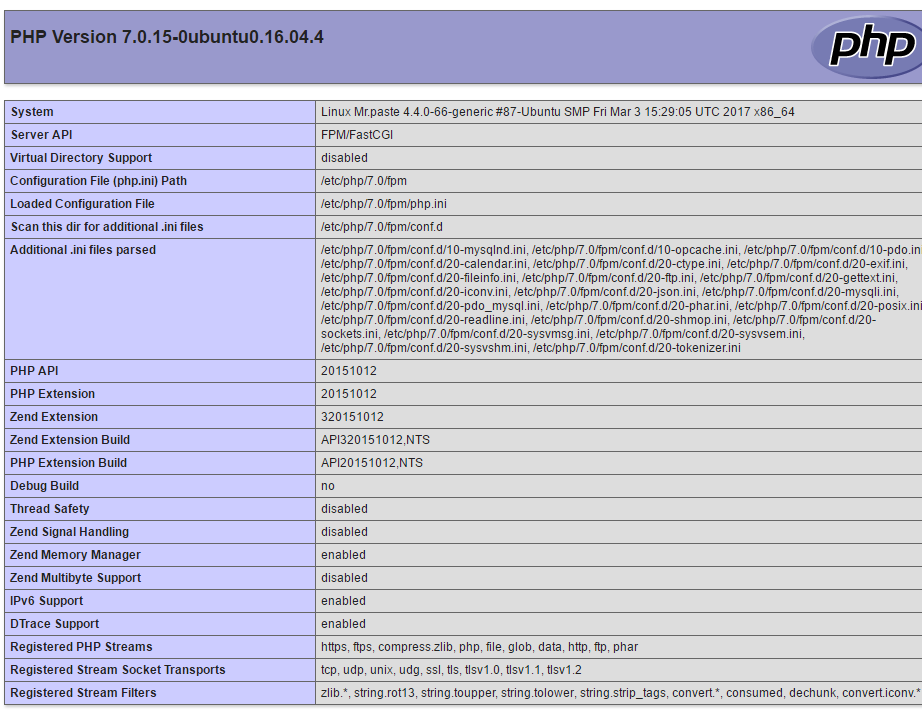
Access to Http: // <ip-VPS address> /info.php via web browser, if shown below is successful
For some security reasons, after you have finished viewing the details of PHP, you should delete this file, you type the following command
# rm -rf /var/www/html/info.php
Step 5: Install MariaDB instead of MySQL
MariaDB One of the most popular database servers. Made by the original developers of MySQL. Guaranteed to stay open source. MariaDB’s is compatible with those used by MySQL, plus a number of features to support native non-blocking operations and progress reports. This means that all connections, libraries, and applications that work with MySQL should also work on MariaDB.
You type the following command to install
# apt-get -y install mariadb-server mariadb-client -y
Now we set the password for MariaDB.
# mysql_secure_installation
The following questions will appear
Enter current password for root (enter for none): <- press enter
Set root password? [Y / n] <- Press "y" to enter Mariadb password
New password: <- enter a new Mariadb password
Re-enter new password: <- Re-enter the new Mariadb password
Remove anonymous users? [Y / n] <- Press "y"
Disallow root login hack? [Y / n] <- Press "y"
Reload privilege tables now? [Y / n] <- Press "y"
To log in to MariaDB
# mysql -u root -p
Conclusion
We have now finished the LEMP installation guide for Ubuntu16, hope that this article will help you understand more about the installation of LEMP, see you in the next article. Good luck!