When renting VPS, to run a WordPress website you need a set of the necessary software.
LEMP is the popular software group today. You must have heard the term accidentally. So what is LEM?
What is LEMP?
LEMP is an acronym for the following software groups: Linux, NGINX (called x engines), Maria DB and PHP.
Linux is an operating system line. Ubutun and CentOS are two popular Linux operating systems when building a VPS running WordPress website.
NGINX is a software web server responsible for handling requests from the browser. It is a web server with good performance compared to Apache.
Maria DB is the optimal version of the MySQL database.
PHP-FPM is responsible for handling PHP code, the language used to develop a WordPress website.
In the article today, I will show you how to install LEMP on CentOS 7 system.
After completing the article, you will install the complete LEMP using the latest software versions such as PHP 7.
Prepare
To perform the installation steps as below, you need to prepare:
- A brand new Linux server installs CentOS. You can buy VPS at Ramnode, Vultr or Linode
- Putty software to connect to the server with user root.
Step 1: Install NGINX on CentOS 7
Because NGINX does not have CentOS repository available, we must install the EPEL repository with the following command:
yum install epel-release -yNext, we install NGINX:
yum install nginx -yThey start with Nginx with the following statement:
systemctl start nginxLet nginx run when restarting VPS you use the following command:
systemctl enable nginxTo check if Nginx has successfully installed, open the browser and access the server’s IP address. If you see the following page is successful:

Step 2 Installing PHP 7.1 on CentOS 7
Your server is still new, so it may not have the wget utility. First, you need to install it:
yum instal wget -yNow you need to install the repository containing the PHP 7.1 package
yum install yum-utils -y yum-config-manager --enable remi-php71Next, install the PHP package:
yum --enablerepo=remi,remi-php71 install php-fpm php-commonInstall some additional PHP modules. If you need to install later, refer to this command:
yum --enablerepo=remi,remi-php71 install php-opcache php-pecl-apcu php-cli php-pear php-pdo php-mysqlnd php-pgsql php-pecl-mongodb php-pecl-redis php-pecl-memcache php-pecl-memcached php-gd php-mbstring php-mcrypt php-xml -yWe need to take some steps to configure PHP to increase security and work with nginx.
First, you need to open php.ini with nano:
nano /etc/php.iniNavigate to the line with cgi.fix_pathinfo to remove a comment as a # and change the value from 1 to 0.
After finishing editing press Ctrl + O and enter to save and Ctrl + X to exit.
By default, PHP will execute the latest PHP file if it can’t find the requested php file. Configuration like this prevents unwanted PHP execution.
cgi.fix_pathinfo=0Tip : in nano you can use the shortcut Ctrl + W to find the word you want.
Next open the file /etc/php-fpm.d/ww w.conf
nano /etc/php-fpm.d/www.confFind the line where listen is listening to localhost with port 9000. You need to convert it to Unix socket. That is when the PHP engine will execute PHP at the server and send it to this address.
listen = /run/php-fpm/php-fpm.sockNext, find listen.owner and listen. group , remove the comment and change the following:
listen.owner = nginx listen.group = nginxNext change the line user = apache and group = apache to
user = nginx group = nginxWhen the change is complete, save and exit nano. Then restart PHP-FPM:
systemctl restart php-fpmSecure php-fpm.sock with the following 2 statements:
chmod 666 /run/php-fpm/php-fpm.sock chown nginx:nginx /run/php-fpm/php-fpm.sockRestart php again:
systemctl restart php-fpmNGINX shaped bridge
Above you have configured nginx working php. On the nginx side you also need to configure.
Open /etc/nginx/nginx.conf with nano:
nano /etc/nginx/nginx.confSurely the following line is in the server section:
include /etc/nginx/default.d/*.conf;Get rid of nano. Create new file /etc/nginx/default.d/default.conf nano:
nano /etc/nginx/conf.d/default.confCopy and paste the code line into the open file in nano: (like replacing your_server_ip with your ip server)
server { listen 80; server_name your_server_ip; # note that these lines are originally from the "location /" block root /usr/share/nginx/html; index index.php index.html index.htm; location / { try_files $uri $uri/ =404; } error_page 404 /404.html; error_page 500 502 503 504 /50x.html; location = /50x.html { root /usr/share/nginx/html; } location ~ \.php$ { try_files $uri =404; fastcgi_pass unix:/var/run/php-fpm/php-fpm.sock; fastcgi_index index.php; fastcgi_param SCRIPT_FILENAME $document_root$fastcgi_script_name; include fastcgi_params; } }This code will ensure how Nginx handles PHP code with FAST CGI.
Restart Nginx:
systemctl restart nginxHas PHP test been run or not
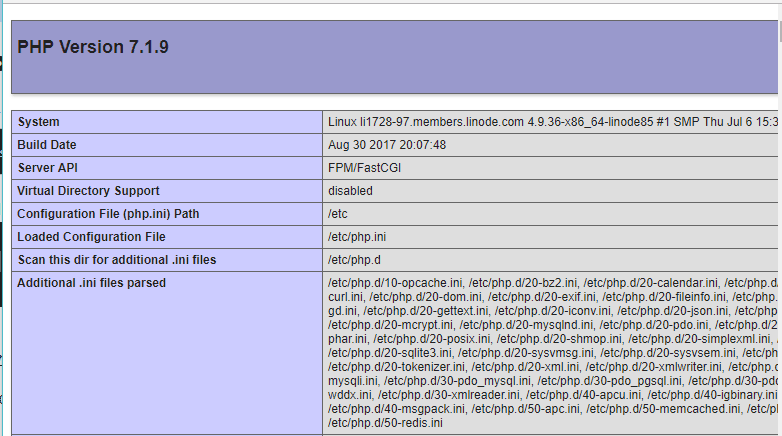
Create file info.php in the following position:
nano /usr/share/nginx/html/info.phpCopy and paste the following line of code into the open file in nano:
< ? php
phpinfo ();
?>
Now you can access the following address: http://yourserver’s IP address / info.php. If you see the screen the following is OK:
Step 3: Install Maria DB
Run the following command to install Maria DB:
yum install mariadb mariadb-serverRun Maria DB with the following command:
systemctl start mariadb.serviceRun Maria DB when starting VPS with the following command:
systemctl enable mariadb.serviceBy default, Maria DB is not very secure. Run the following command to increase security for Maria DB.
/usr/bin/mysql_secure_installationFirst, it will ask you to Enter current password for root. Now you don’t have the password for root, so type Enter.
Next, it asks Set Root Password? You type y and enter a password for the root account.
Later questions you go on choosing.
Finally, you restart Maria DB:
systemctl restart mariadb.serviceNow that you have installed LEMP for CentOS 7.
If you encounter any difficulty, just leave a comment below.