LAMP stack (Linux, Apache, MySQL, PHP) is a group of open source software that is often reinstalled to allow servers to host websites (Including dynamic web) and web app, including Linux operating system, along with Apache web server. The data is stored in a MySQL database (using MariaDB), and the dynamic content is handled by PHP.
In this article, I will show you how to install the Linux, Apache, MySQL, PHP web server including LAMP stack (Linux, Apache, MySQL, PHP)
First, you need to prepare a new CentOS server that has not been installed at all. You can buy VPS at RamNode, Linode ,Vultr.. It’s the best choice. Check that the hostname and file host are correct before starting.
Before starting, you need to prepare: Putty Software and SSH root access to the server.
Step 1: Install Apache
Apache was published in 1995 and it is the most popular and long-lived HTTP server software. The Apache project is run by the open source Apache Software Foundation community, meaning it is free. To install it, you only just run the following command in the terminal:
yum install httpd -y
Now, start the Apache service and activate it at startup:
systemctl start httpd.service
systemctl enable httpd.service
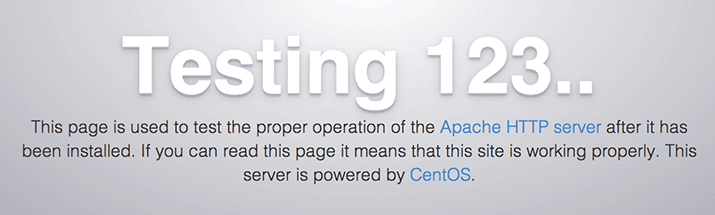
You can test on the spot immediately to verify that the installation was successful by visiting the server’s public IP address in your web browser (see below to see how to get the public IP address):
https://youripaddress
The default page of CentOS displays:
Step 2 – Install MySQL (MariaDB)
MariaDB is a community-developed service similar to MySQL, the good point is that it’s free. Since it also belongs to the default repositories of CentOS, just run Yum:
yum install mariadb-server mariadb -y
When the process is complete, run MariaDB and activate it on startup:
systemctl start mariadb
systemctl enable mariadb
Install a few more security scripts to remove unsafe components and restrict unauthorized access to the database:
mysql_secure_installation
When asked about the password, leave it blank and press Enter. You will then be asked to add a root password. Enter the password and then click Y, then follow these instructions:
Enter current password for root (just hit Enter and do NOTHING):
OK, successfully used password, moving on...
Setting the root password ensures that nobody can log into the MariaDB
root user without the proper authorization.
New password: passwordRe-enter new password: passwordPassword updated successfully!
Reloading privilege tables..
... Success!
This process removes some of the default users and databases, disables the remote root logins, and reloads so that MySQL accepts the changes. Press ENTER to accept the default settings.
The final step is for MariaDB to start with the server.
sudo systemctl enable mariadb.service
Now the database is ready and you can continue installing PHP.
Step 3 – Install PHP
PHP engine needs to run PHP code, access database and download data to Apache. Again, you can use Yum to install PHP packages. Run the following command in terminal:
yum install php php-mysql -y
Restart Apache Web Server so that it works with PHP:
systemctl restart httpd.service
Install PHP modules to use their functions.
To see which modules and libraries can be installed, use the command:
yum search php-
The above command returns all modules and libraries with a short specification about them:
php-bcmath.x86_64 : A module for PHP applications for using the bcmath library
php-cli.x86_64 : Command-line interface for PHP
php-common.x86_64 : Common files for PHP
php-dba.x86_64 : A database abstraction layer module for PHP applications
php-devel.x86_64 : Files needed for building PHP extensions
php-embedded.x86_64 : PHP library for embedding in applications
php-enchant.x86_64 : Enchant spelling extension for PHP applications
php-fpm.x86_64 : PHP FastCGI Process Manager
php-gd.x86_64 : A module for PHP applications for using the gd graphics library
. . .
To see specific information about a module, type the command:
yum info package_name
There will be many outputs, with the field Description providing information about the functions that the module supports.
Example with module php-fpm :
yum info php-fpm
Ouput:
. . .
Summary : PHP FastCGI Process Manager
URL : http://www.php.net/
License : PHP and Zend and BSD
Description : PHP-FPM (FastCGI Process Manager) is an alternative PHP FastCGI
: implementation with some additional features useful for sites of
: any size, especially busier sites.
Use the command yum install to install the package as usual, for example:
sudo yum install php-fpm
If you want to install multiple packages at the same time, use the command:
sudo yum install package1package2...
with package1, package2 ... is the package name you want to install.
Step 4 – Check the PHP engine
Create a simple script name info.php. In order for Apache to find the file and correct it, the script file needs to be saved in a specific directory, called “web root”.
In CentOS 7, this folder is /var/www/html/. Create the file in that directory with the command:
sudo vi /var/www/html/info.php
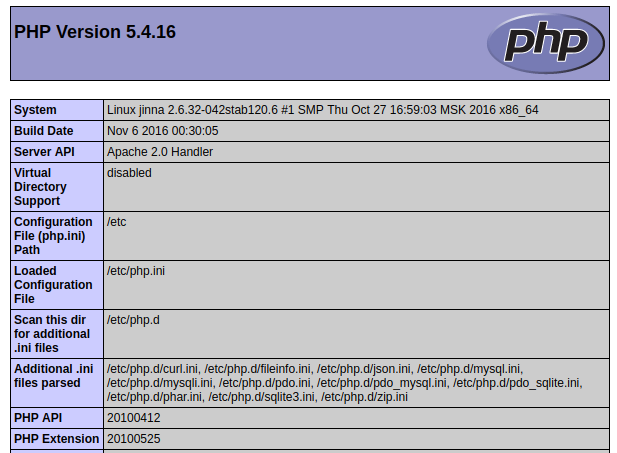
Now, go to info.php file with IP, as follows:
http://your_server_IP_address/info.php
You will see the default page with the same version as the header:
Here you have successfully installed the LAMP stack on your CentOS 6, 7 servers. You have a basic platform to install most websites and web applications on the server.